🔧 Clean Washing Machine Inlet Filter: Complete Guide for Hard Water Homes
📋 Quick Navigation
Problem Overview
In hard water areas across India (Delhi NCR, Bangalore, Hyderabad, Pune, Gurgaon, Chennai), washing machine inlet filters get clogged with calcium deposits, limestone buildup, rust particles, and sediment from overhead tanks. This causes slow water fill, no fill, or complete cycle failure. Regular inlet filter cleaning—every 1-2 months in hard water zones—prevents these issues and keeps your machine running efficiently. Learn more about testing and treating hard water in India.
Safety First
-
!
Turn off water supply: Close both hot and cold water inlet taps (usually behind or near machine) completely before disconnecting any hoses to prevent flooding.
-
!
Unplug the machine: Always disconnect power before working on water inlet components to avoid electrical shock when handling wet parts and solenoid valves.
-
!
Prepare for water spillage: Keep towels, bucket, and mop ready—residual water in hoses and inlet valve will drip when disconnected (approximately 100-200ml).
-
!
Handle filters gently: Inlet filter mesh is delicate—aggressive cleaning or dropping can tear the screen, requiring expensive valve replacement (₹800-₹2,500).
🔍 Quick Checks: Is Your Inlet Filter Clogged? ⏱️ 5-10 minutes
1 Slow Water Fill
If your machine takes more than 10-15 minutes to fill (normal is 5-8 minutes), inlet filters are likely clogged with hard water deposits.
2 No Water Entry
Machine starts cycle but no water enters the drum, or inlet valve clicks but water doesn't flow—classic sign of completely blocked filter screens.
3 Intermittent Fill
Water flow starts and stops repeatedly, or trickles instead of steady stream—indicates partial filter blockage from sediment buildup.
4 Error Codes Display
Display shows IE, 1E, E1, CE, or 4C error codes (water inlet timeout)—machine detects water not filling within expected time frame.
💡 Common Causes of Inlet Filter Clogging in Hard Water Areas
Problem
Hard water mineral deposits (calcium carbonate, limestone, magnesium)
Solution
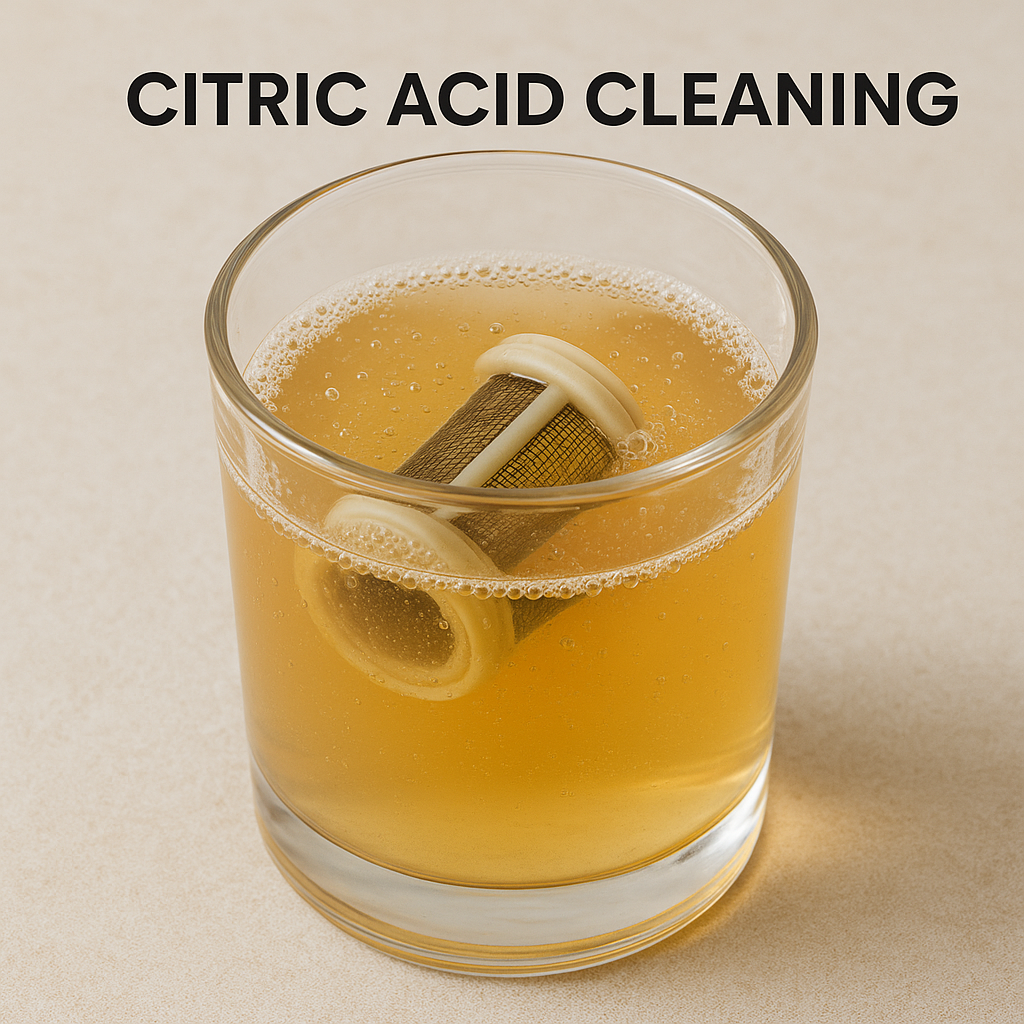
Soak filters in white vinegar (30-60 minutes) or citric acid solution to dissolve mineral buildup
Problem
Rust particles from old iron water pipes or corroded overhead tanks
Solution
Brush filter under running water; install external pre-filter; consider overhead tank cleaning/replacement
Problem
Sand, sediment, and mud from overhead tank or municipal water supply
Solution
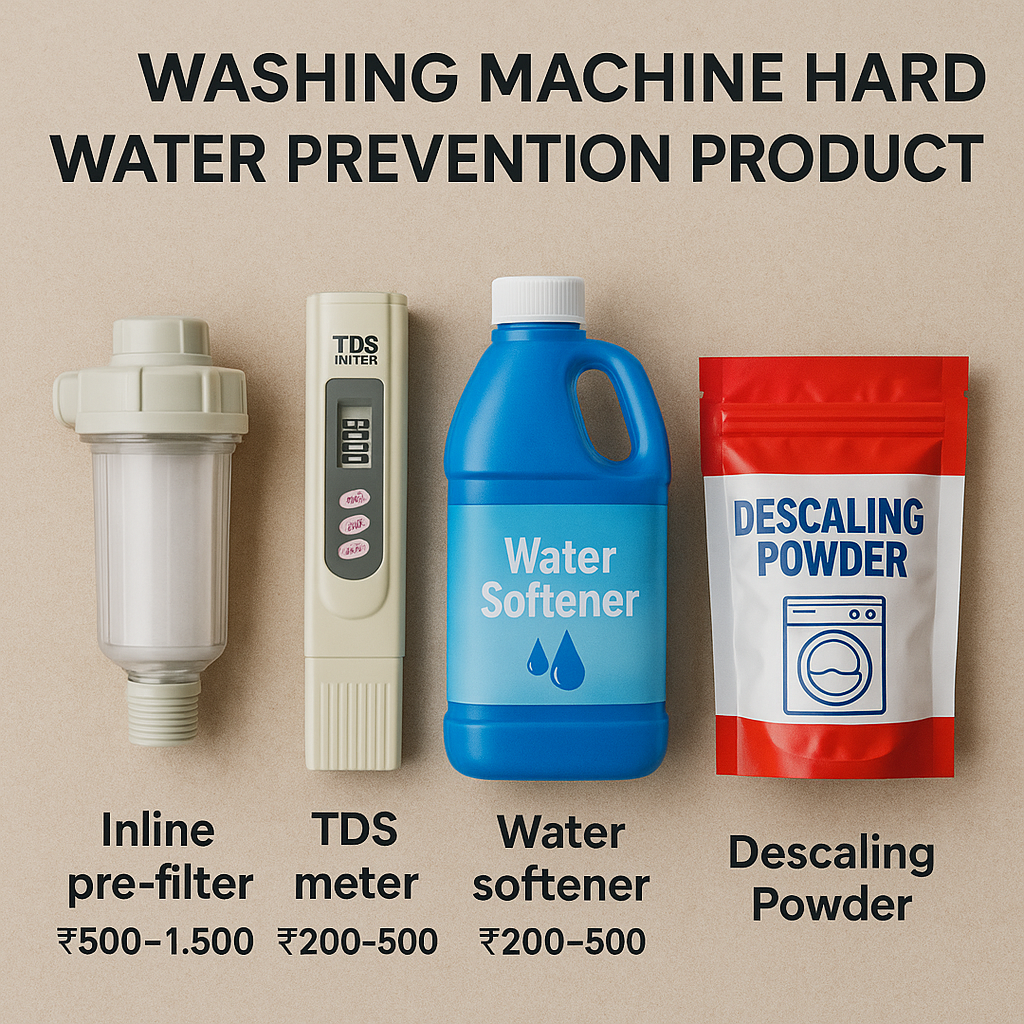
Clean filters monthly during monsoon season; install whole-house sediment filter (₹500-₹1,500)
Problem
Municipal water debris, chlorine residue, and pipeline maintenance sediment
Solution
Increase cleaning frequency after municipal pipeline work; flush taps for 2-3 minutes before running washer
Problem
Filter mesh completely blocked—no water flow even when taps fully open
Solution
Extended vinegar soak (2-3 hours) or overnight citric acid soak; may require filter replacement if mesh damaged
Problem
Multiple filter locations need cleaning (inlet valve has 2 filters: hose end + valve end)
Solution
Check and clean both filter locations—hose connection filters and inlet valve port filters (see detailed steps below)
🛠️ Complete DIY Inlet Filter Cleaning Guide
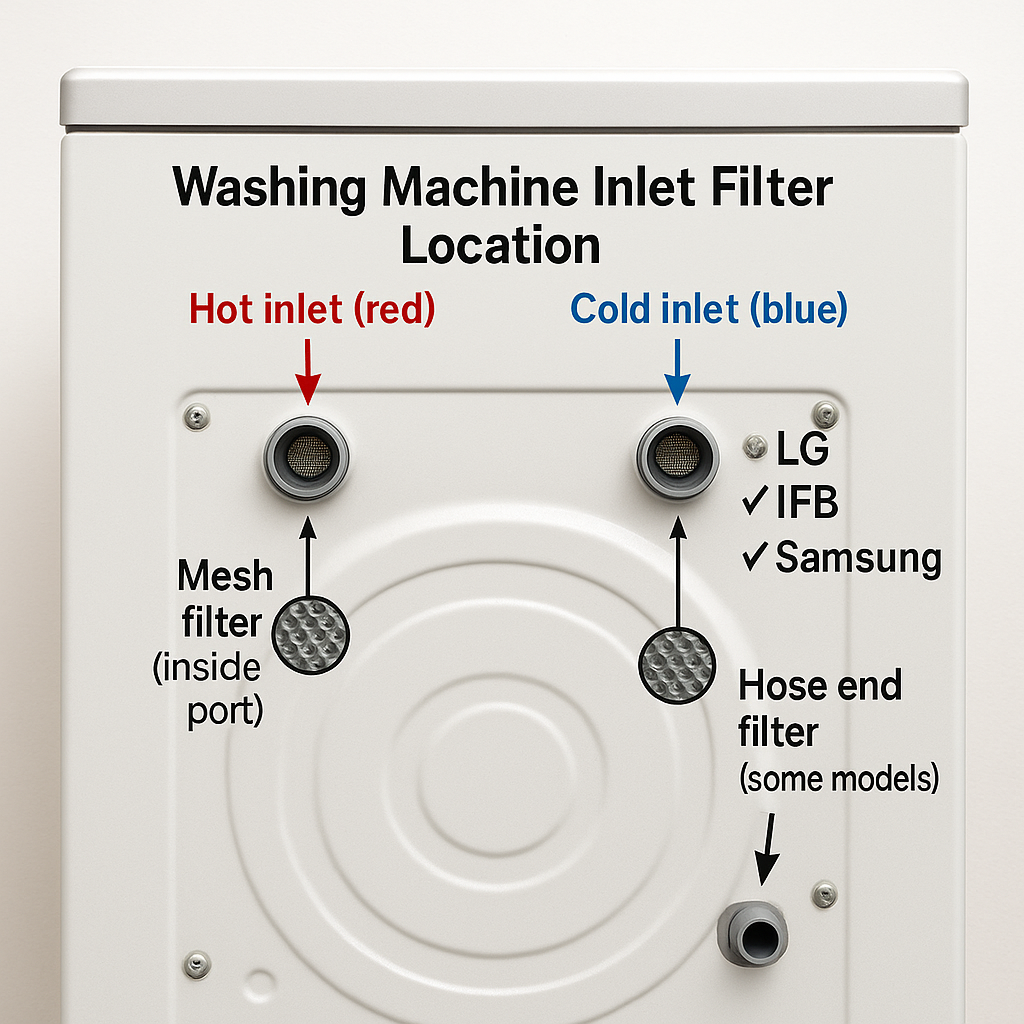
Locate Inlet Filters: Know Your Machine Layout
Where to find inlet filters:
• Back of machine: Most common location—look for water inlet hose connections (usually two: hot and cold)
• Top-back corner: In top-load machines, inlet valve is often under top panel
• Brand-specific locations:
- IFB: Behind back panel, accessible after removing screws
- LG: Directly at inlet hose connections on back wall
- Samsung: Top-back corner under plastic cover
- Bosch: Lower back panel, near floor level
- Whirlpool: Top-back, accessed via top panel removal
• Two filter locations: (1) Inside inlet valve ports where hoses connect, (2) Sometimes at hose ends themselves
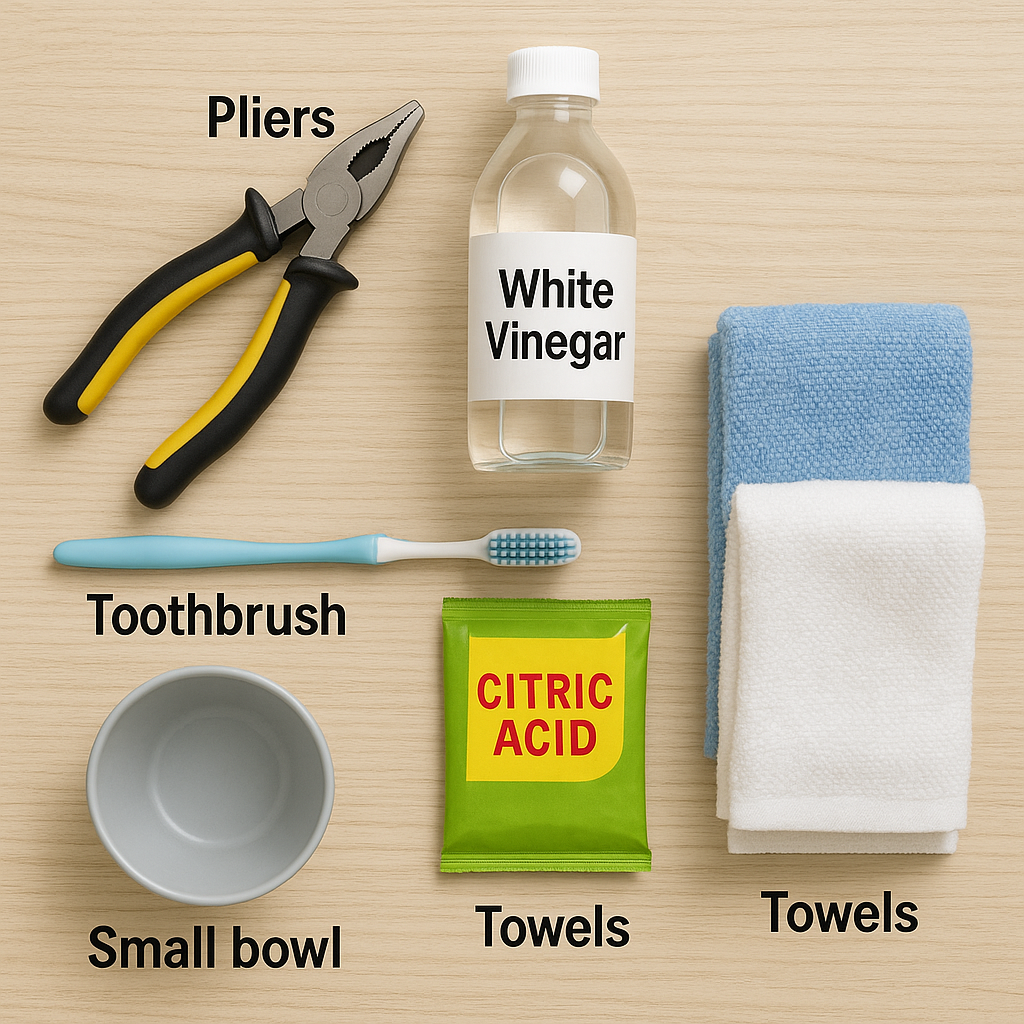
Gather Tools and Materials (Total Cost: ₹50-₹150)
What you'll need:
• Pliers: Adjustable or slip-joint pliers to disconnect hose connections
• Old toothbrush: Soft-bristled for gentle filter scrubbing
• White vinegar: 1 cup (200-250ml) for soaking—dissolves calcium deposits
• Bucket or container: To catch residual water and soak filters
• Towels/rags: Multiple for floor protection and wiping
• Small bowl: For vinegar or citric acid soaking solution
• Citric acid (optional): 2-3 tablespoons (₹20-₹30 at grocery stores)—stronger than vinegar for heavy buildup
• Flashlight/phone light: To inspect filter condition inside inlet ports
• Gloves (optional): To protect hands from dirty water
Prepare Machine: Safety and Access
Preparation steps:
• Turn off water supply: Close both inlet taps completely (turn clockwise)—usually behind machine or on wall
• Unplug machine: Remove power plug from socket completely
• Pull machine forward: Gently move washer 1-2 feet from wall for access to back panel
• Lay towels on floor: Place absorbent towels behind machine and under hose area
• Place bucket: Position bucket under inlet hose connections to catch water
• Wait 2-3 minutes: Allow any pressure in water lines to dissipate
• Test taps: Try turning them slightly to confirm they're fully closed (no water flow)
Remove Inlet Hoses: Access the Filters
Disconnection procedure:
• Identify hose connections: Usually two threaded connections on back of machine (hot/cold or single inlet)
• Loosen with pliers: Turn hose connection counter-clockwise using pliers—may be tight from calcium buildup
• Hand unscrew: Once loose, remove by hand—water will drip, catch with bucket/towel
• Drain hoses: Point hose ends into bucket to empty residual water completely
• Set hoses aside: Place on towel—don't let ends touch dirty floor
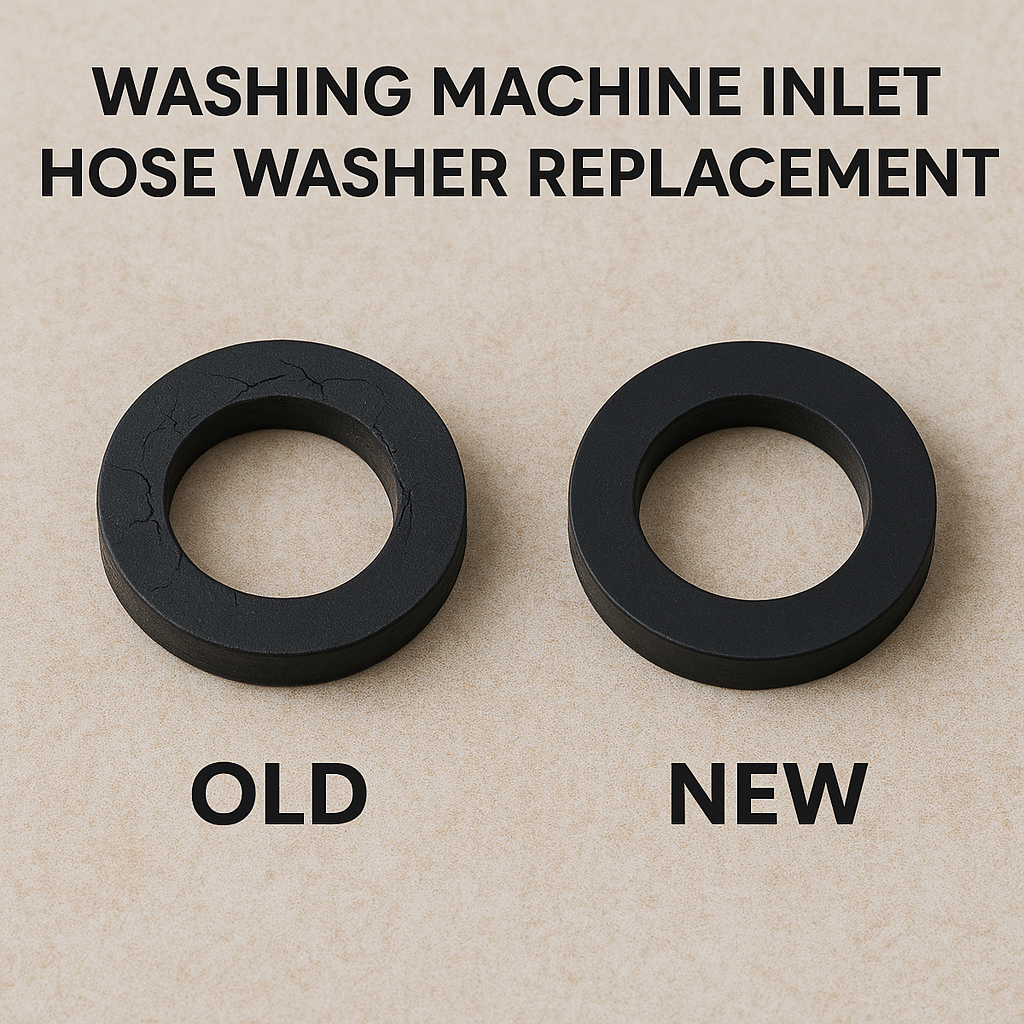
• Inspect hose washers: Look at rubber washers inside hose ends—replace if cracked or flattened (₹5-₹10 each)
• Check hose-end filters: Some hoses have small filters at the ends—remove and inspect these too
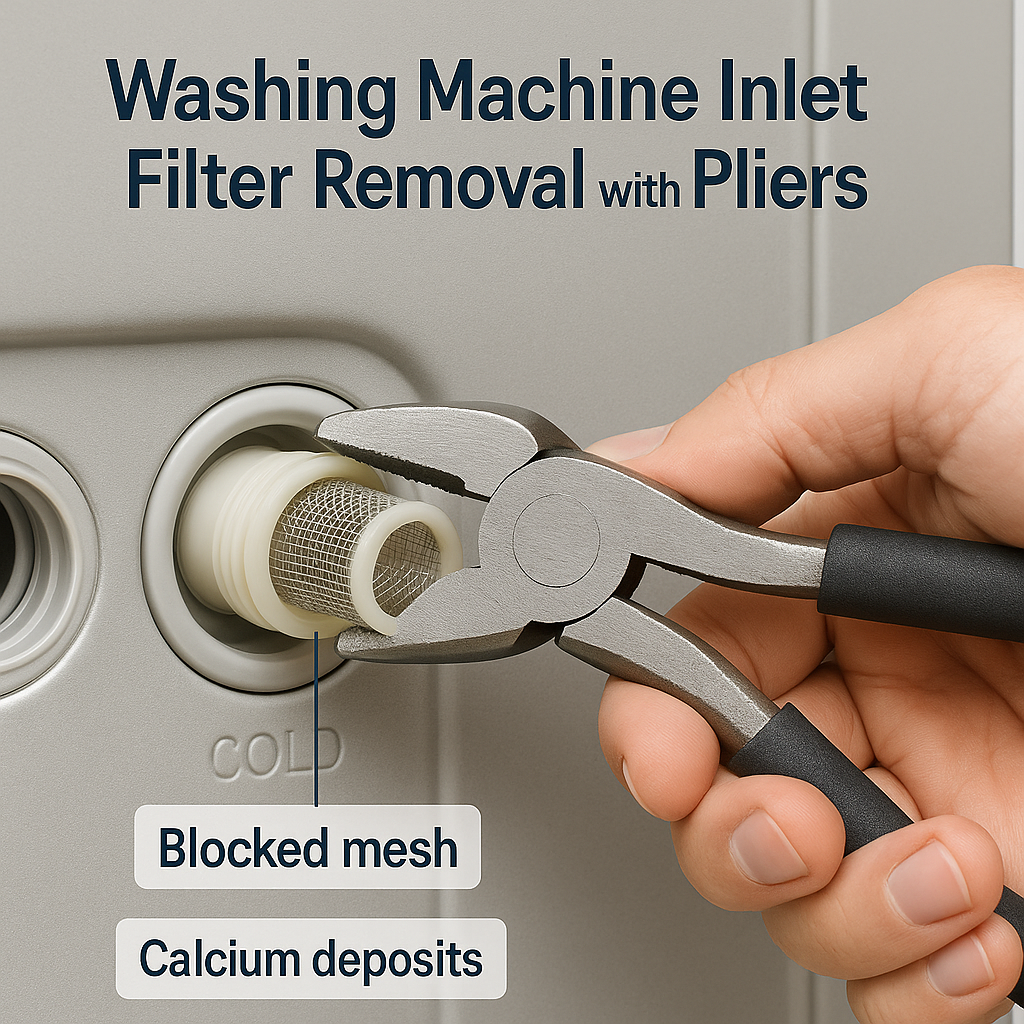
Extract Filters: Careful Removal
Filter removal:
• Shine light into inlet ports: Use flashlight to locate filter screens inside valve openings
• Filter appearance: Small mesh screens or cylindrical filters (usually plastic or metal mesh)
• Use pliers carefully: Grip filter edge gently with needle-nose pliers or tweezers
• Pull straight out: Extract filter slowly—don't bend or twist excessively
• Note filter orientation: Some filters have specific installation direction—note which way is "up"
• Permanently attached filters: If filter doesn't come out, it may be built-in—clean in place (see next step)
• Count filters: Most machines have 2 filters (hot/cold inlets) or 1 filter (single inlet)—clean all
• Photograph for reference: Take quick photo of filter position before removal
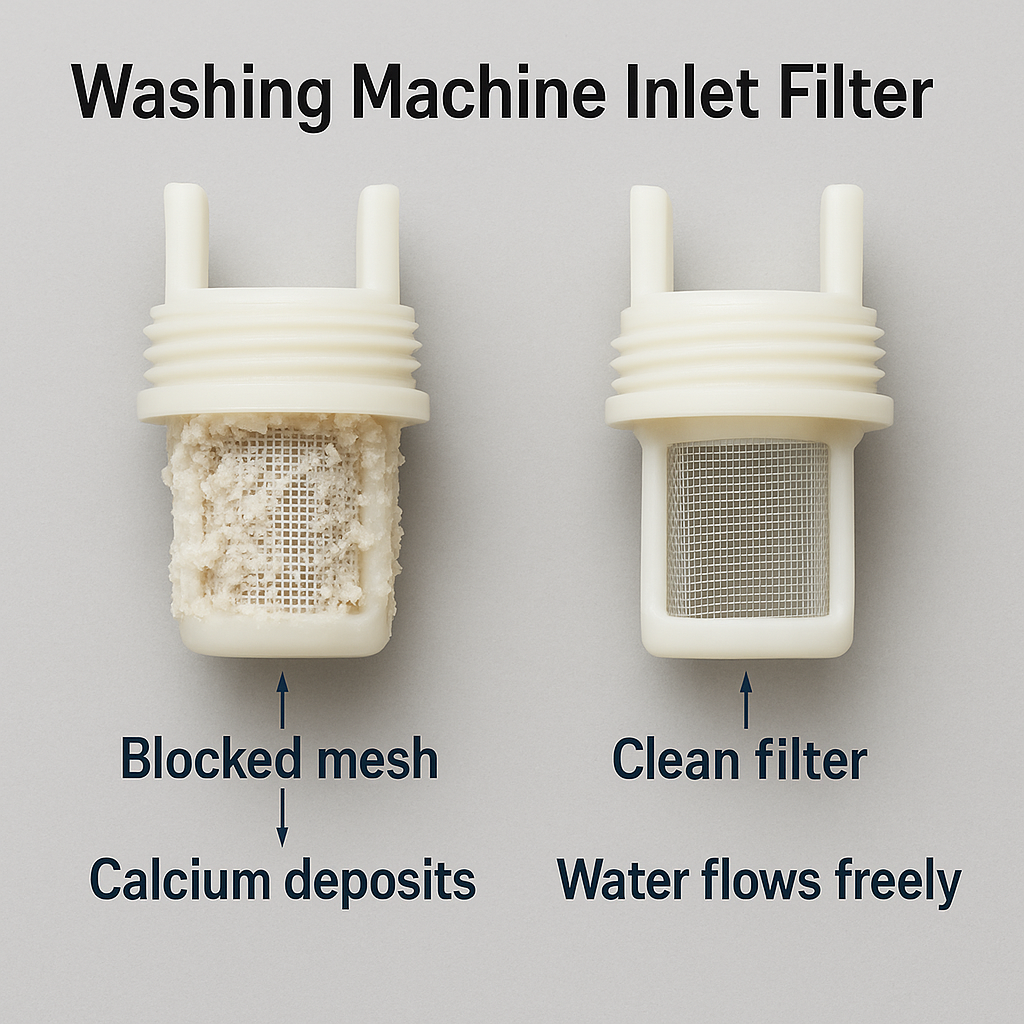
Clean Filters: Methods by Buildup Severity
Method 1 - Light buildup (recent cleaning):
• Rinse filter under strong running tap water
• Brush gently with old toothbrush in circular motions
• Hold up to light—should see through mesh clearly
• Dry with clean cloth or air dry
Method 2 - Moderate buildup (3-6 months since cleaning):
• Soak filter in white vinegar for 30-60 minutes in small bowl
• Brush with toothbrush while soaking to loosen deposits
• Rinse thoroughly under running water
• Repeat soaking if calcium remains visible
• Verify all mesh holes are open and clear
Method 3 - Heavy buildup (hard water areas, 6+ months neglect):
• Mix citric acid solution: 2-3 tablespoons in 1 cup warm water
• Soak filter for 2-3 hours or overnight
• Use toothbrush to scrub away dissolved deposits
• For stubborn spots: make paste of citric acid + water, apply directly
• Rinse multiple times under running water until completely clean
• If still clogged: repeat process or consider filter replacement
For permanently attached filters (can't remove):
• Use small spray bottle to spray vinegar directly into filter
• Let soak 30 minutes, then flush with water from tap
• Use toothbrush or small bottle brush to scrub in place
• Repeat until water flows freely through mesh

Inspect for Damage: Replace if Needed
Damage inspection checklist:
• Hold filter to light: Look for tears, holes, or broken mesh sections
• Check mesh integrity: Should be uniform with no gaps larger than original holes
• Inspect plastic rim: Should be intact, not cracked or brittle
• Test flexibility: Gently press—should have some give, not be completely rigid (calcified beyond repair)
• Color check: Heavy rust staining or black corrosion may indicate filter degradation
• Smell test: Strong mildew or mold odor means biofilm growth—deep clean or replace
• When to replace: Any tears, broken sections, or if mesh holes are permanently enlarged
• Replacement options: Brand-specific filters (₹200-₹500) or universal mesh filters (₹50-₹150)
Reinstall Filters: Proper Sealing
Installation procedure:
• Ensure filters dry: Shake off excess water or air dry for 2-3 minutes
• Check orientation: Some filters have "up" marking or directional tabs—install correctly
• Insert gently: Push filter straight into inlet port—should slide in easily
• Seat fully: Press until filter is flush with valve opening, not sticking out
• Test security: Gently tug—filter should be firmly seated, not loose
• Visual check: Shine light to verify filter is centered and covering entire inlet opening
• Install all filters: Repeat for both hot and cold inlets (or all inlet ports on your model)
• Clean inlet ports: While filters are out, wipe inlet port threads and interior with damp cloth to remove debris
Reconnect Hoses: Leak-Free Connection
Hose reconnection:
• Inspect rubber washers: Check washer inside hose connection—should be soft and flexible, not hard or cracked
• Replace worn washers: If flattened or damaged, replace with new rubber washers (₹5-₹10 each)
• Align threads: Start threading hose connection by hand—should screw on easily, no forcing
• Hand tighten: Screw connection clockwise until hand-tight and resistance increases
• Use pliers for final turn: Add 1/4 turn (90 degrees) with pliers—don't over-tighten
• Check both connections: Ensure hot and cold hoses connected to correct ports (if labeled)
• Visual alignment: Hoses should not be twisted or kinked—gentle curves only
• Leave slack: Don't stretch hoses tight—leave 2-3 inches slack for machine vibration
Test Water Flow: Verify Successful Cleaning
Testing procedure:
• Keep machine unplugged initially: For leak testing first
• Open water supply taps: Turn both taps counter-clockwise fully open
• Check for leaks: Inspect all hose connections—should be completely dry, no drips
• Tighten if leaking: If dripping, tighten connection 1/8 turn more or replace washer
• Plug in machine: Once leak-free, restore power
• Push machine back: Return to normal position against wall (gently to avoid hose kinks)
• Run quick rinse cycle: Select shortest cycle with water fill
• Observe fill speed: Should fill noticeably faster than before cleaning (5-8 minutes is normal)
• Listen for steady flow: Water should flow continuously, not sputter or trickle
• Check for error codes: Display should not show inlet errors (IE, 1E, E1, CE, 4C)
• Monitor first few cycles: Watch for leaks during next 2-3 wash cycles
📞 When to Call a Professional
⚡ Internal Access Issues
- • Inlet valve requires removing machine panels beyond your comfort level
- • Filters are permanently attached and can't be cleaned adequately in place
- • Inlet valve housing cracked or damaged during cleaning attempt
- • Unable to extract filters without risking damage to valve
- • Machine still under warranty—DIY may void coverage
🔧 Persistent Problems After Cleaning
- • Water still doesn't fill or fills very slowly after thorough filter cleaning
- • Inlet valve replacement needed (solenoid failure detected)
- • Internal hose disconnected from inlet valve inside machine
- • Chronic low water pressure requiring whole-house pressure solution
- • Multiple error codes persist even after filter cleaning
💰 Estimated Service Costs (India, 2025):
• Filter cleaning service call: ₹300-₹500 (if you prefer not to DIY)
• Inlet valve replacement (including labor): ₹1,200-₹3,500
• External pre-filter installation: ₹500-₹1,500
• Water pressure booster pump: ₹4,000-₹10,000 (for chronic low pressure)
• Full inlet system overhaul: ₹2,000-₹5,000
🛡️ Preventive Care for Hard Water Areas
Every 1-2 Months
Clean inlet filters in hard water areas (Delhi NCR, Bangalore, Pune, Hyderabad). Monthly during monsoon season when sediment increases.
Every 6 Months
Install external pre-filter (₹500-₹1,500) to catch sediment before inlet valve. Clean overhead tank to reduce rust and sand. Replace hose washers.
Warning Signs
Fill time gradually increasing, intermittent water flow, or inlet error codes appearing—clean filters immediately before complete blockage occurs.
💧 Hard Water Prevention Solutions
Immediate Solutions:
- • Install inline sediment pre-filter (₹500-₹1,500)
- • Clean overhead water tank every 6 months
- • Flush water taps before running washer after municipal work
- • Use washing machine cleaner monthly (descaler)
Long-term Solutions:
- • Consider whole-house water softener (₹15,000-₹50,000)
- • Upgrade to RO or filtered water for all appliances
- • Replace old iron pipes with PVC to reduce rust
- • Install water quality filter at main entry point
💡 Choosing a Hard Water-Resistant Machine? Check our Complete Washing Machine Buying Guide for models with superior inlet filters, stainless steel drums, and hard water protection features.
📊 Hard Water Severity by Indian Cities & Cleaning Frequency
| City/Region | TDS Level (ppm) | Water Hardness | Filter Cleaning Frequency |
|---|---|---|---|
| Delhi NCR (Gurgaon, Noida) | 400-800 | ❌ Very Hard | Every 4-6 weeks |
| Bangalore | 300-600 | ⚠️ Hard | Every 6-8 weeks |
| Hyderabad | 350-700 | ⚠️ Hard | Every 6-8 weeks |
| Pune | 300-500 | ⚠️ Moderate-Hard | Every 8-10 weeks |
| Chennai | 200-500 | ⚠️ Moderate | Every 10-12 weeks |
| Mumbai | 150-350 | ✅ Soft-Moderate | Every 12-16 weeks |
| Kolkata | 100-300 | ✅ Soft-Moderate | Every 12-16 weeks |
💧 How to test your water hardness: Buy TDS meter online (₹200-₹500) or water test strips (₹100-₹300). Measure your tap water: Below 150 ppm = soft water, 150-300 = moderate, 300-500 = hard, 500+ = very hard. Adjust filter cleaning frequency based on your actual TDS reading.
❓ Frequently Asked Questions
Q1: How often should I clean inlet filters in hard water areas?
In hard water zones (Delhi NCR, Bangalore, Hyderabad, Pune with TDS 300-800 ppm), clean inlet filters every 4-8 weeks. Very hard water (TDS 500+) requires monthly cleaning. Normal water areas: every 3 months is sufficient. Increase frequency during monsoon season when sediment increases.
Q2: Where exactly is the inlet filter located in my washing machine?
Inlet filters are located inside the water inlet valve ports where hoses connect at the back of machine. Some machines also have filters at the hose ends. Look for small mesh screens or cylindrical filters when you disconnect the inlet hoses from the machine. Brand-specific: IFB behind back panel, LG at direct hose connections, Samsung top-back corner.
Q3: Can I run washing machine without inlet filter temporarily?
Never run washing machine without inlet filters, even for a single cycle. Debris, sand, and sediment will enter the inlet valve solenoid and cause permanent damage requiring valve replacement (₹800-₹2,500). If filter is damaged, use clean nylon stocking as temporary makeshift filter until replacement arrives.
Q4: Vinegar vs citric acid for cleaning—which is better for hard water?
Citric acid is more effective for hard water calcium deposits. Use 2-3 tablespoons citric acid in 1 cup warm water, soak 2-3 hours. Vinegar works for light buildup (soak 30-60 minutes). For stubborn Indian hard water deposits, citric acid (nimbu ka phool) is recommended—stronger, no smell, easily available at grocery stores for ₹20-₹30.
Q5: Filter cleaning vs replacement—when should I replace the filter?
Replace inlet filter when: mesh is torn or has holes, plastic rim is cracked, mesh holes permanently enlarged, or heavy corrosion/rust staining. If thorough cleaning (overnight citric acid soak) doesn't restore water flow, replace. Brand-specific filters cost ₹200-₹500, universal mesh filters ₹50-₹150. Replace every 3-5 years as preventive maintenance.
Q6: Will using RO water or water softener reduce inlet filter clogging?
Yes, significantly. RO water or softened water has minimal calcium/magnesium, reducing filter clogging by 70-80%. However, sediment and rust from pipes still occurs, so clean filters every 4-6 months even with soft water. Whole-house water softener (₹15,000-₹50,000) is best long-term solution for hard water areas, protecting all appliances.
Q7: What's the difference between inlet filter and lint filter?
Inlet filter (water inlet filter) is at water input—catches sediment from water supply before entering machine. Lint filter (drain filter) is at water output—catches lint, coins, debris from clothes during drain cycle. Both need regular cleaning: inlet filter every 1-3 months (hard water), lint filter after every 5-10 washes. Completely different locations and purposes.
Q8: Machine still fills slowly after filter cleaning—what's wrong?
If slow fill persists after thorough filter cleaning: (1) Check building water pressure is adequate (test by filling bucket from tap—should fill fast), (2) Verify inlet valve solenoid isn't failing (listen for clicking sound), (3) Check for kinked inlet hoses, (4) Test water level pressure switch isn't faulty. If all OK, inlet valve may need replacement (₹1,200-₹3,500 with service).
⚠️ Disclaimer: This guide is for informational purposes only. Always turn off water supply and unplug appliances before attempting repairs. Working with water inlet systems involves both water and electricity—exercise extreme caution. Handle inlet filters gently as they are delicate and expensive to replace. If uncomfortable with DIY maintenance or if machine is under warranty, contact an authorized service center. Improper cleaning can damage inlet valves or cause water leaks. Water damage to home and property is your responsibility. Follow all manufacturer guidelines and safety instructions.
Important Safety Reminder
If you're not comfortable with any step, or if the problem persists after trying these solutions, please contact a qualified technician. Safety should always be your first priority when dealing with electrical appliances.
You May Also Like
Discover more helpful guides and reviews to make informed decisions
Front Load vs Top Load Washing Machine 2025: Which Saves More? (Real Data)
Front load saves ₹904/year on water but top load washes 40% faster. Complete comparison with actual running costs, fabric care, maintenance for Indian homes. Find which type suits your family size & budget.
Instant vs Storage Geyser 2025: Which Saves More Electricity? (Power Calculator)
Storage geyser (2kW) vs instant (3-6kW): Storage better for Indian homes with limited electrical capacity. Complete comparison of power consumption, winter performance, space needs & costs for bathrooms.
Vertical vs Horizontal Geyser 2025: Which Gives Better Hot Water? (Space Guide)
Vertical geysers give 15-20% more consistent hot water vs horizontal. Compare space needs (18"×14" vs 24"×10"), installation cost (₹500-800 difference), thermal efficiency & real Indian bathroom fits.
AMOLED vs IPS LCD 2025: Which Phone Display is Better? (Eye Comfort Test)
AMOLED: infinite contrast & Always-On Display vs IPS LCD: no PWM flicker & no burn-in. Complete comparison for ₹15k-₹35k phones. PWM sensitivity test, battery life, brightness, real-world usage guide.
Autoclean vs Filter Kitchen Chimney: Complete 5-Year Cost Analysis 2025
Complete comparison guide for choosing between autoclean (filterless) and filter-based kitchen chimneys for Indian cooking. Compare costs, maintenance, performance and 5-year total ownership cost.
Inverter vs Non-Inverter AC 2025: Which Saves More Money? (₹ Calculator)
Complete comparison: Inverter AC saves ₹5,000/year on bills for 8hr/day use vs non-inverter. Temperature stability, noise, efficiency & real electricity cost breakdown for Indian summers 2025.
Latex vs Memory Foam Mattress 2025: Which Stays Cooler? (Temperature Test)
Latex sleeps 3-4°C cooler than memory foam in Indian summers. Complete comparison: durability (latex 12+ years vs foam 6-8), price, support, comfort. Which mattress for hot sleepers?
Microfiber vs Memory Foam Pillow 2025: Which for Neck Pain? (Support Test)
Memory foam gives consistent neck support vs microfiber loses shape. Compare: washability (micro wins), cooling (micro cooler), price (₹500-₹2k vs ₹1.5k-₹5k), durability, sleep positions.
Oil-filled vs Fan Heater 2025: Which for Delhi/Punjab Winters? (Cost & Silence Test)
Oil-filled heaters save ₹500-₹1,200/winter through heat retention vs fan heaters (quick 5-min warmup). Compare silence (0 dB vs 50 dB), safety for kids, running costs @₹8/kWh for Delhi-NCR, Punjab, Haryana winters.
Need to Buy a New Washing Machine?
Check out our comprehensive buying guides and reviews